Building a Mission
A mission is the list of commands a run executes, in order. Nothing plays until there is one, and what plays is exactly what the list says — including which entries are ticked and which are not.
Where it is
The Execution page at /execution, Mission branch of the Control Tree; /mission lands on the
same place. This is the page the application opens on.
The list is assembled and rearranged on the tree rows themselves: the Mission row and every List row carry a + that adds a command, and every command row carries a drag handle in front of its label and its own move, duplicate and delete buttons. The Mission node's panel below the tree is informational — the command count and a hint naming those affordances. A command's own settings are edited one level in, on that command's node.
Add a command
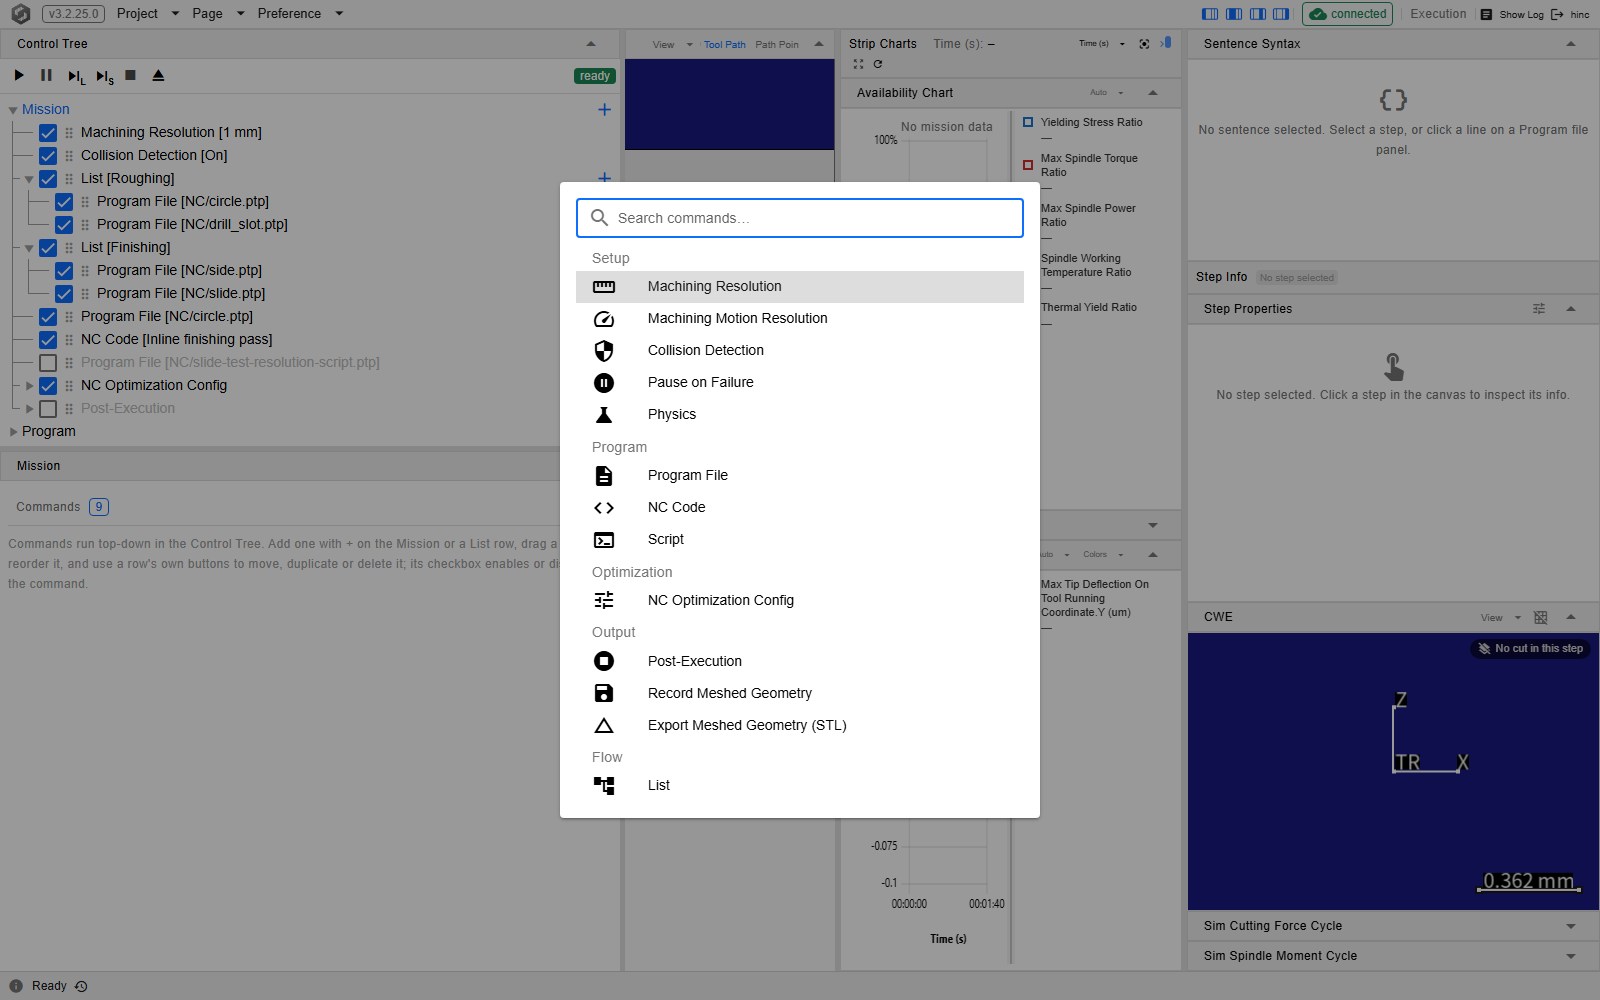
The + pinned to the right edge of the Mission row, or of any List row, is Add Command; it opens a search-first picker. Type to narrow it: the search matches a command's display name, its internal kind key and the aliases it declares, and an alias matches both by its English key and by its word in the interface language. Arrow keys walk the results and Enter takes the highlighted one.
Results are grouped by category. Thirteen kinds ship:
| Category | Commands |
|---|---|
| Setup | Machining Resolution, Machining Motion Resolution, Collision Detection, Pause on Failure, Physics |
| Program | Program File, NC Code, Script |
| Optimization | NC Optimization Config |
| Output | Post-Execution, Record Meshed Geometry, Export Meshed Geometry (STL) |
| Flow | List |
What you pick lands in the list whose + you pressed, directly after the focused command when that command is an entry of the same list, and at the list's end otherwise. The focus is the selected command — or, while the selection sits on one of a command's child nodes, the command that owns it — or the command the last add created; and when a move, duplicate, delete or drag carries the selection to another row, the focus follows it there. So a run of adds lands in order below the focus, and the Mission row's + always adds at root level even while a command inside a group is selected. The new row is revealed in the tree, but the selection stays where it was rather than jumping into the new command. Nothing is pinned to a position: the order is entirely yours, and every command is placeable anywhere.
Add Command is disabled until a project is open. With nothing open the Mission panel reads No project loaded. Open or create a project first. With a project and an empty mission it reads No commands yet and names the button.
The set on offer is served by the application rather than built into the interface, so a command kind can appear in this dialog before this manual has a page for it.
The picker over the demo mission, at /execution?tree=execution/mission with the Mission
row's + pressed. The five category headings are the grouping in the table above, the search
box at the top is what narrows them, and the first result is highlighted ready for
Enter.
The shape to start from
An empty list is legal, but it is not where a project should end up. A finished mission has the same shape whatever it machines: setup at the top, the program in the middle, the program held between two Record Meshed Geometry entries, output at the bottom.
| Setup | Machining Resolution, Machining Motion Resolution, Collision Detection, Pause on Failure, Physics |
| Output | Record Meshed Geometry — Cache/<stage>-init.wct, the stock |
| Program | Program File |
| Output | Record Meshed Geometry — Cache/<stage>-done.wct, the result |
| Output | Post-Execution |
The two records are what make a run restartable, and they are part of the shape rather than an advanced extra — a mission without them replays the whole job from the stock every time. Two rules travel with them:
- Machining Resolution belongs above the first record. The cache is meshed at whatever resolution is in force when the record runs, so a resolution set below it is silently baked out of the file.
- Keep the first record where the stock is an STL, drop it where the stock is procedural (a box or a cylindroid) or is already a recorded mesh. Meshing an STL is a fixed cost paid on every play; a box the kernel builds instantly, and caching it costs more than it saves.
A Mission That Resumes is this layout in full, with the reasoning and the measurements behind each row.
Read a row
Each row shows the command's kind and, where one detail identifies the command, that detail after
it in brackets. Where you can name a command that detail is the title you typed, so a row still says
what it is after it has been named: List [Roughing], NC Code [Inline finishing pass] — and
while the title is empty the row is the bare kind, NC Code or Script. Where you cannot, the
command brackets what it holds instead — Program File [NC/circle.ptp],
Machining Resolution [1 mm], Collision Detection [On] — so a mission is readable without
opening anything. Two kinds have no single detail to show and read as their kind alone:
NC Optimization Config and Post-Execution, whose settings are the child nodes beneath the row
rather than one value.
Every command row carries four buttons — Move up, Move down, Duplicate and Delete — revealed while the pointer is over the row or while the row is selected, and always shown on a touch screen. Up and down are disabled at the ends of the list. Delete asks for confirmation, in a dialog naming the command. Duplicate is a deep copy: a group copies with everything inside it, and the copy lands directly after the original. The selection follows the operation when it sits on the acted-on row or anywhere beneath it: on an entry inside a group when you act on the group's row, or on a child node when you act on its command's row. It then lands on the acted-on row itself — the row at its new position, the copy, or the nearest survivor of a delete (the list itself, once it is empty) — so an editor you were in beneath that row is replaced by the row's own panel. Acting on a row the selection is neither on nor under leaves the selection, and the editor you are in, where they are.
Before a row operation writes anything — for a delete, only after you have confirmed it — it settles whatever the open editor has not yet saved. If you cancel that prompt, the operation is dropped and a notice says so.
Clicking a row anywhere but on its checkbox or a button selects that command and opens its editor below the tree.
Tick what runs
The checkbox at the front of a command row is the only thing that decides whether a command runs. Clearing it greys the row; the editor stays open and fully editable, with a note that the command is disabled. Clearing the box on a group greys the whole group, and the run skips the group together with everything nested inside it.
Leaving a command in place with its box cleared is how you skip a step without losing its settings, which is what you want while you narrow down a problem.
Group with a list
List is an ordinary command in the Flow category, and adding one grows a sub-tree: its children are its own entries, rows with the same handle and buttons one level down, and its row carries its own +. That nests to any depth, so a mission can be grouped by operation rather than left flat.
A list carries an optional title, and its node's panel holds that Title (optional) field alone —
its entries are its rows in the tree — with, as on any command, the note that it is disabled above
the field while its checkbox is cleared. The row reads List while the title is empty and
List [title] once it says something; a title of nothing but spaces counts as unset. The Mission
root is the one list with no title field — it reads Mission.
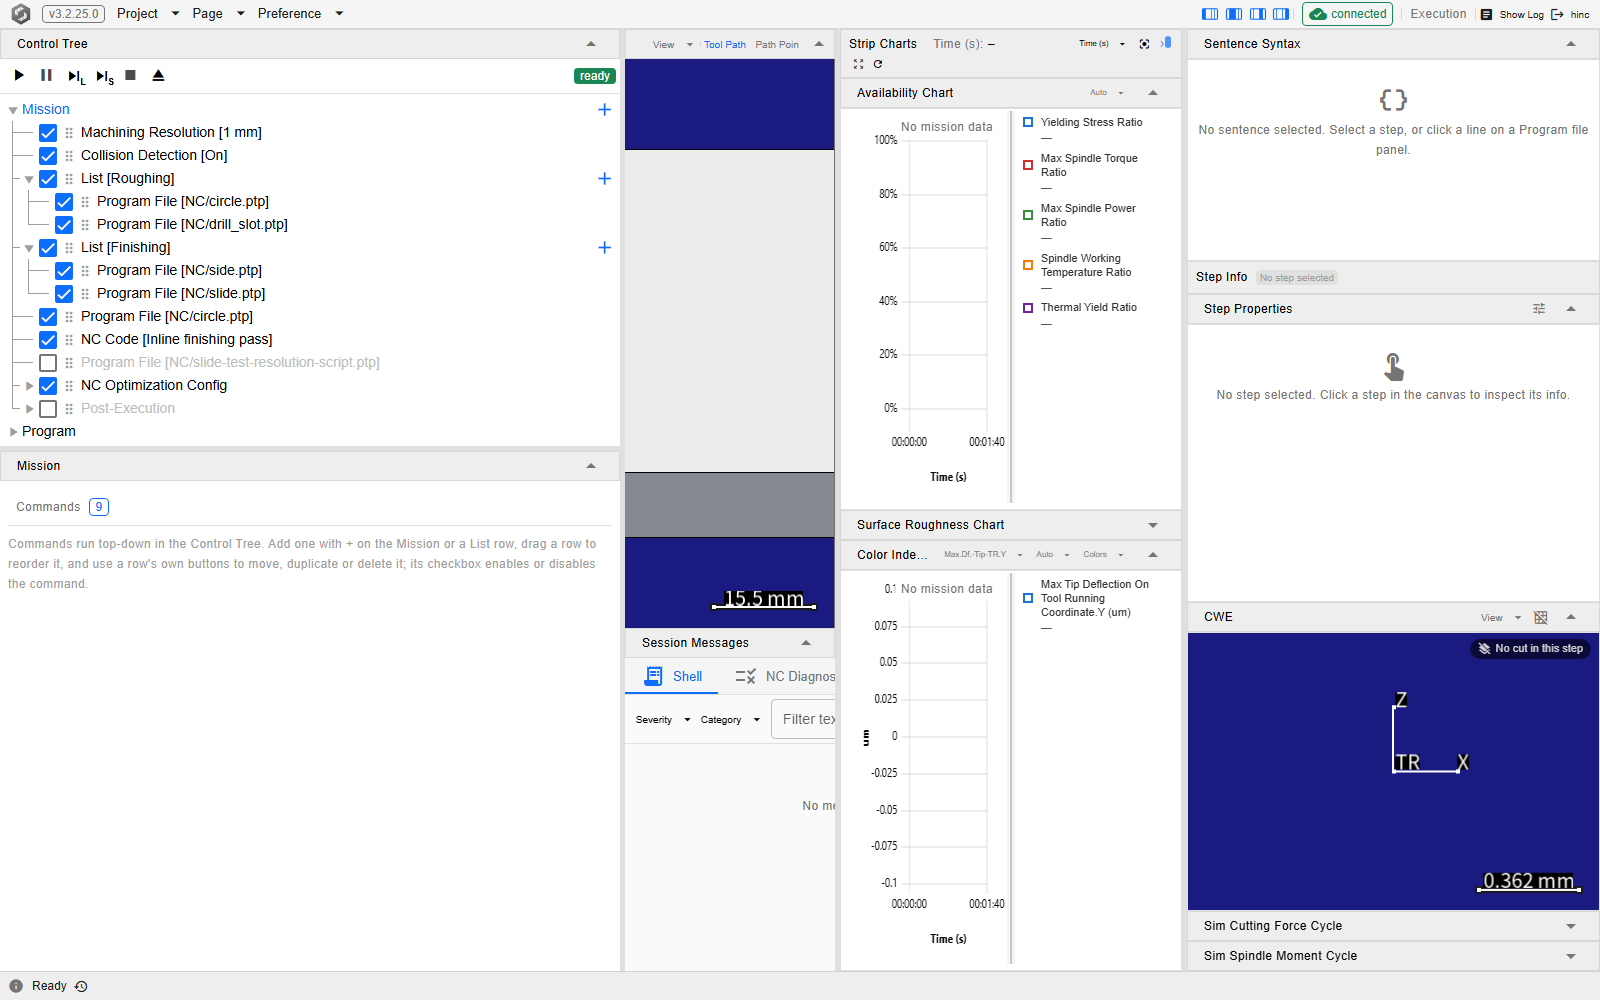
The demo mission at /execution?tree=execution/mission: two groups and seven loose entries. The
transport buttons and the ready badge sit at the top of the Control Tree; Mission is its
first root, with List [Roughing] and List [Finishing] opened and the two Program File
entries inside each bracketing their files, and the Mission row and both List rows carry a
+ at the right edge. The Program root sits collapsed beneath. The Mission panel below
the tree reads Commands 9 and the hint naming the row affordances. The greyed Program File
and Post-Execution rows are entries left in place with their checkboxes cleared — part of the
mission, and not run.
Reorder, and move in and out
Up and down move an entry within its own list and never change which list owns it. Dragging a row does more — the handle in front of its label marks the row as draggable, but the whole row is the grip: a drag started on the handle, on the label or on the blank space beside them picks the row up — and where you drop decides which:
| Drop it on | What happens |
|---|---|
| A command row | Land before or after it — the row splits at its midline. In the same list that is a reorder; in another list, the entry moves there. |
| The middle band of a List row | Move the entry into that list, at its end. The row's outer quarters still land before or after it. |
| The Mission row | Move the entry into the root list, at its end — the whole row is a landing. |
While the drag is over a row, a line along the row's top or bottom edge marks before or after and a tinted row marks into. To take an entry out of a group, drop it on a row outside the group, or on the Mission row. Moving a list into itself, or into one of its own groups, is refused. A dragged command that was selected — or that held the selection somewhere beneath it, on one of its entries or child nodes — is selected where it lands; the selection on any other row stays on that row.
Dragging serves rearrangement only. The tree accepts nothing but its own rows: text or a file dragged in from outside gets the browser's no-drop cursor over every row, and releasing it there hands the drop to the browser's own default rather than to the application — nothing is imported, and a browser typically opens a dropped file in the tab, leaving the page. To bring several programs in at once, use one Program File command's picker and select them together: the extra files become Program File commands directly after that one; see Playing a Program.
Edit one command
Select a command's row. Its editor opens in the panel below the tree — the editor alone, with a note while the command is switched off. Moving, duplicating and deleting stay on the row.
A command with one job — Program File, NC Code, Script — puts its whole editor on that one node. A command with several cards spreads them: the general settings stay on the command node and each remaining card becomes a child node beneath it, so a long command is read by walking down the tree rather than by scrolling one panel. Where a card had its own Enable switch, that switch is the child node's own checkbox. Which commands do that, and what each card holds, is The Other Commands.
See Also
- Running a Simulation — the rest of running a job
- Playing a Program — the two commands that put NC code into a run
- The Other Commands — what the rest of the command kinds are for
- A Mission That Resumes — the shape a mission should start from, in full
- Starting and Stepping — the transport that plays the list built here
- Mission Root Panel — the node behind this branch: the row operations, the picker and the three drag landings
- List Command Panel — the component behind a group: what nesting costs, and what a disabled list skips